Overview
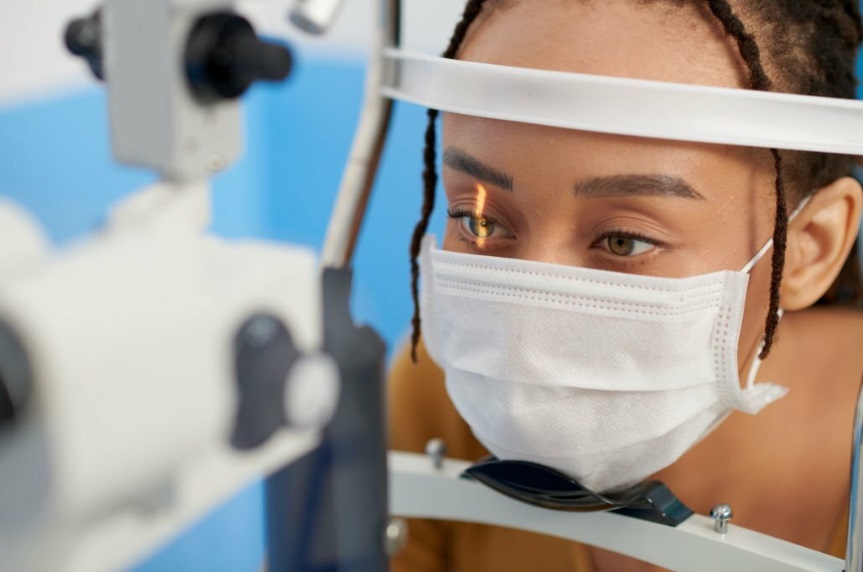
Slit Lamp illumination techniques are essential for accurate ophthalmic examination. Knowing the right technique enables you to arrive at the right diagnosis and offer the right treatment for your patient. Slit Lamp is an instrument used by optometrists and Ophthalmologists to look at different parts of the eye including the inner tissues. It is a stereoscopic biomicroscope and a lamp that focuses light on the eye at different angles, heights and widths. The instrument is generally made up of an observation system, a mechanical support system and an illumination system.
Illumination System consists of:
- Light source (lamp)
- Beam height adjustment
- Beam width adjuster
- Filters for illumination
- Power switch
- Rheostat
The Observation system consists of:
- Eyepiece & objective lenses (forming the microscope)
- Magnification (the telescope) with a biprism to reinvent the image
Mechanical support system:
- The forehead rest for the patient
- The chin rest for the patient
- Chin adjustment knob
- Patient support handles
- Canthus alignment indicator
- Adjustable table
- Joystick
- Locking knob
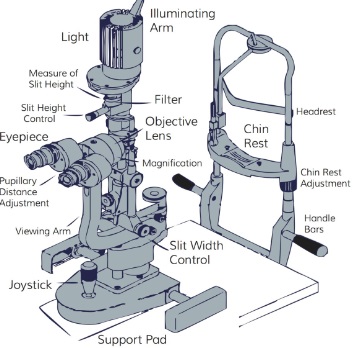
Though these are the three main units or systems, some specifications like magnifications and the overall design may vary depending on the brand of the slit lamp.
Slit Lamp Illumination Techniques
Slit Lamp Illumination Techniques can be classified as Direct and Indirect. With Direct Illumination you have, Direct Diffuse and Direct Focal.
Under Direct Focal, you have Parallelepiped, Optical Section, Conical Beam Illumination, Tangential Illumination and Specular reflection.
Under Indirect you have, Retroillumination, Transillumination, Sclerotic scatter and Oscillating Illumination of Koeppe. Now let break it down…
Direct Illumination
Diffuse Illumination
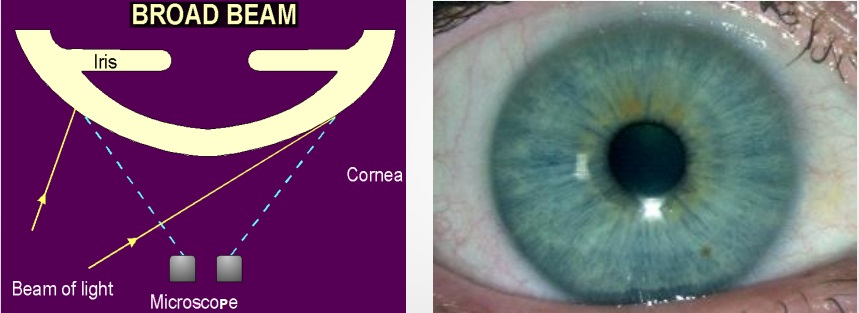
This is one of the Slit Lamp illumination techniques that is used to examine the ocular surface in general, the eyelashes, sclera, conjunctiva, pattern of redness, iris, pupil, gross pathology, etc. Despite giving an overall picture of the ocular surface, it does not present it in fine detail. To do this technique:
- Illumination: medium to high.
- Magnification: low to medium
- Use a diffuse filter
- The angle between the microscope and the illumination system should be 30-45 degrees.
- The slit width is maintained at the widest.
Direct Focal illumination
Direct focal illumination refers to projecting the light until it coincides with the correct focus of the microscope. Unlike diffused light, concentrated light penetrates transparent structures. With a centred slit beam, there is always direct focal illumination. This type of illumination has about 5 subdivisions:
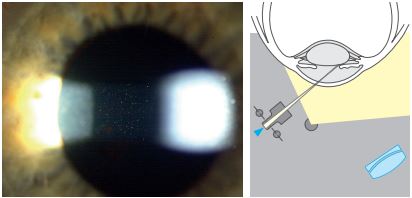
Parallelepiped
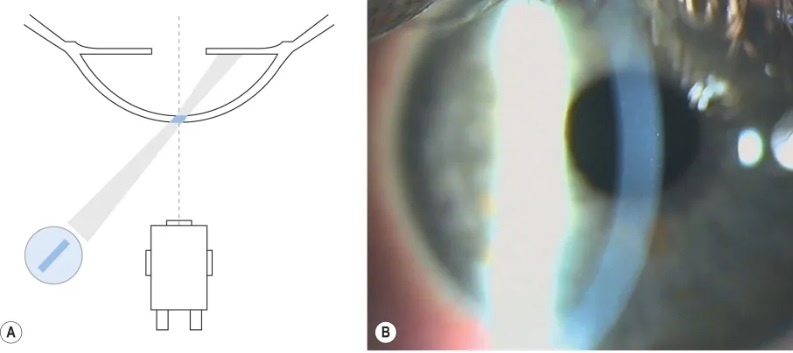
In this technique, a narrow beam of 2-3mm in width is used to illuminate a rectangular area of the cornea. The microscope is placed directly in front of the patient’s cornea and the illumination system is placed approximately 45 degrees from straight-ahead position. This technique is used to examine:
- Opaque features in the cornea such as scars, abrasions, nebulae, blood vessels and foreign bodies.
- Cells and flare in the anterior chamber
- Detect cornea striae that develop when cornea oedema occurs with hydrogel lens wear and in keratoconus.
- Two different layers of illumination, one on the epithelium and one on the endothelium
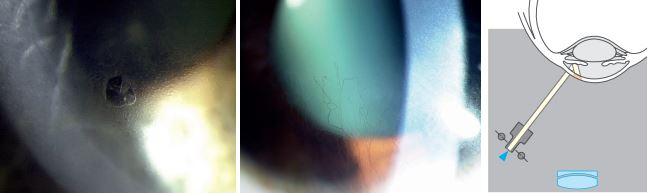
Optical Section Illumination
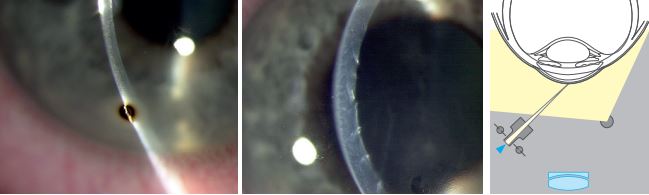
An optic section is a very thin parallelepiped. The optical section appears like a knife on the histological section. This technique allows viewing of both the cornea, lens, and anterior vitreous face into much details. It has two subcategories:
i. Cornea Optical section: To do this technique…
- Magnification- 16x or 25x
- Slit illumination <2mm
- Slit illumination 45-60 degrees from the biomicroscope
Uses:
- Corneal thickness, thinning and distortions in the cornea curvature
- Corneal foreign body depth and location
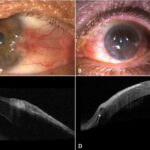
- Anterior chamber angle grading- Van Herrick method
The Van Herrick technique: To evaluate anterior chamber angle without gonioscopy.
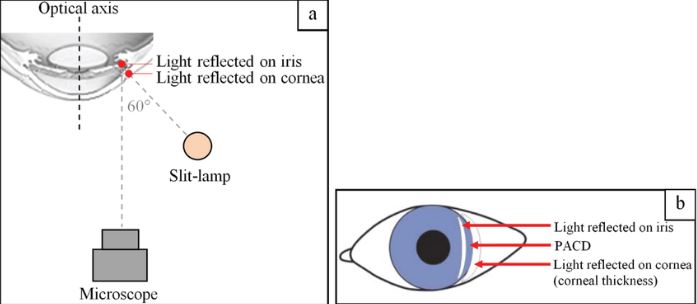
- Medium magnification
- Angle 60 degrees
- Narrow beam <2mm close to the limbus
- Biomicroscope: directly in front of the eye
For this method, compare the gap between the slit illumination to the slit section of the cornea that will be cast, and below is the grading in ratio.
- Grade 4 – open anterior chamber angle 1:1 ratio- the gap is the same as the slit section
- Grade 3 – open anterior chamber angle 1:2 ratio- gap is half as slit section
- Grade 2– narrow anterior chamber angle1:4 ratio- the gap is 1/4th of the slit section
- Grade 1– risky narrow anterior chamber angle less than 1:4 ratio- is less than 1/4th
- Grade 0– closed anterior chamber, cornea “sits” on iris
ii. Lens optical Section:
Project a narrow focal slit beam at a 45-60° angle to the lens while making an optical section. A narrow beam <2mm, and the biomicroscope should be directly in front of the eye.
Use this technique to examine the various zones and layers of the lens. Because of the problematic depth of field, it is not entirely possible to photograph the entire lens section in focus. It is therefore necessary to focus on the anterior or the posterior lens surface separately.
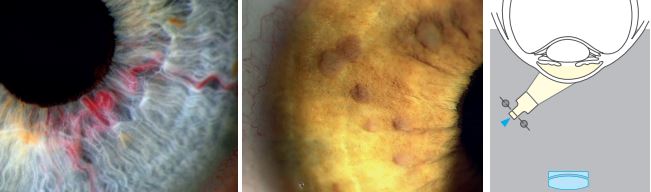
Conical Beam Illumination
- Produced by narrowing the vertical height of a parallelepiped to produce a small circular or square spot of light.
- Angle a high-intensity light at 45-60 degrees and direct it into the pupil.
- Biomicroscope: directly in front of the eye.
- High magnification
Focus the beam of light between the cornea and the anterior lens surface to observe the dark zone in between. This will reveal any floating cells or flares in the anterior chamber.
The Tyndall Phenomenon
This Phenomenon is the same as that of a beam of sunlight streaming through a room illuminating dust particles in the air. Cells, pigments or proteins in the aqueous humour reflect the light like a faint fog. Use a conical beam in this phenomenon, with the angle typically between 40 to 90 degrees, though the strongest reflection occurs at 90°.
Tangential Illumination
The anterior and posterior cornea surfaces as well as the iris can be viewed with this technique. The anterior lens surface especially in pseudoexfolation can be observed with this technique.
- The beam width should be medium-wide with moderate height.
- Separate the illumination arm and the observation arm by 80-90 degrees.
- Magnifications should be low to moderate.
Specular reflection
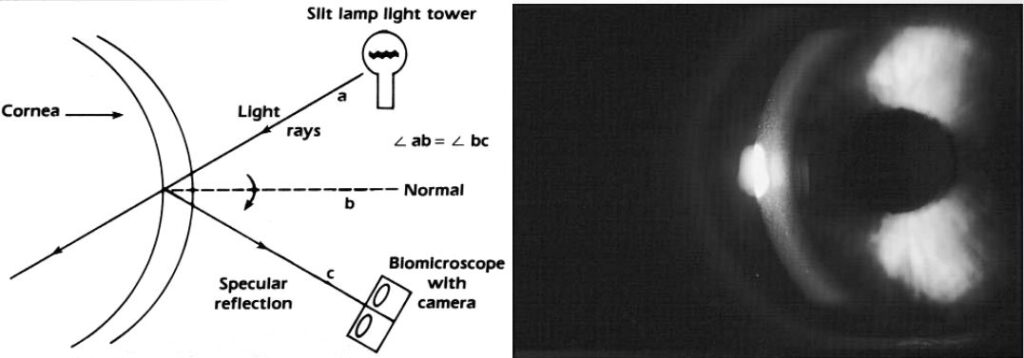
Use this technique to check the integrity of the corneal and lens surfaces. Thus, If the surface is smooth, the reflection will be smooth and regular but if the surface has some irregularities or deposits, it will fail to reflect light and these appear darker than the surrounding.
Under specular reflection, the anterior corneal surface appears as a white uniform surface and the corneal endothelium takes on a mosaic of cells pattern. To achieve specular reflection…
- Instruct the patient to look 30 degrees temporally.
- The angle between the slit and biomicroscope is about 60 degrees.
- Highest magnification available.
- Position the light slit at 3 to 4 mm from the limbus.
- Achieve specular reflection when the angle of incidence equals the angle of reflection.
Indirect Illumination
With indirect illumination, the light does not fall directly on the pathology. Decentre the slit beam and project it just adjacent to the subject area, illuminating it with scattered internally reflected light. This illumination technique has some subcategories:
Retroillumination
In this technique, a light beam of 2-4mm wide is reflected off the iris or the retina while the biomicroscope is focused on the cornea.
- Used most often in searching for keratic precipitates and other debris on the corneal endothelium.
- Retro-illuminate the crystalline lens to view water clefts and vacuoles of the anterior lens and posterior subcapsular cataracts.
Retroillumination has been further classified as direct (from iris and fundus) or indirect.
Direct Retroillumination
Iris Direct Retroillumination:
- Use magnification of 16x to 25x and direct the light from 45 degrees.
- Biomicroscope: directly in front of the eye
- Aim a moderately wide slit beam towards the iris directly behind the corneal anomaly.
Retina Direct Retroillumination:
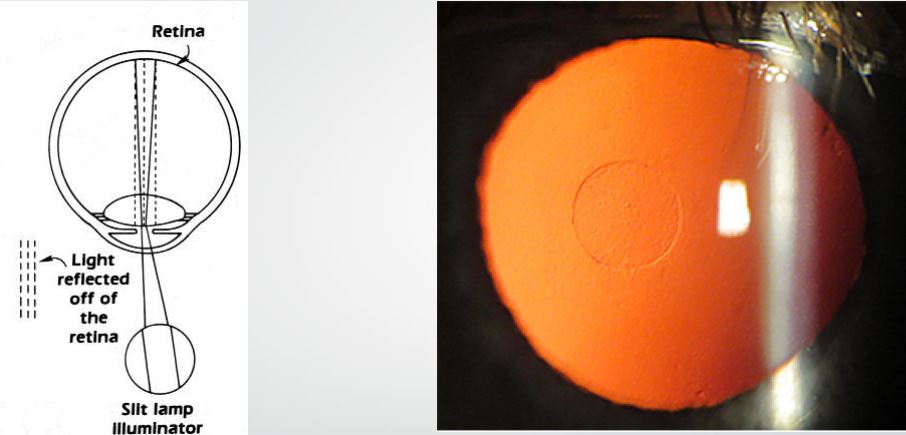
- Use this technique to observe media clarity and opacities.
- Position the light almost coaxially with the biomicroscope with the slit beam at 2 to 4 degrees
- Shorten the beam to the height of the pupil to avoid reflecting the bright light off of the iris.
- Project the decentered slit beam near the pupil margin through a dilated pupil
- Focus the microscope directly on the pathology using 10X to 16X magnification. Opacities will appear in silhouette
Indirect Retroillumination
Indirect Retroillumination from Iris:
- Perform it as direct retro-illumination, but direct the beam to an area of the iris bordering the portion of the iris behind pathology.
- It provides a dark background that enhances the contrast for viewing corneal opacities.
- Observe: Cornea, angles.
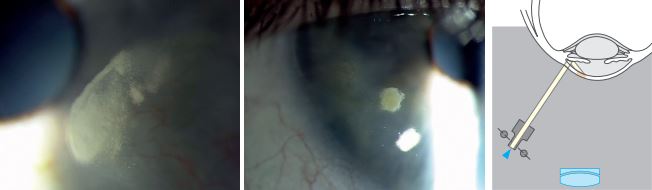
Transilluimantion

- The pupil must be at mid-mydriasis (3-4 mm when stimulated with light).
- Place the light source coaxial (directly in line) with the microscope.
- Use a full circle high-intensity beam of light equal to the size of the pupil.
- Project the light through the pupil and into the eye.
- Focus the microscope on the iris and Magnification of 10X to 16X is adequate.
Use transillumination for the following observations:
- We evaluate the iris based on how it allows the passage of light through it after reflecting off the retina.
- Normally the iris pigment absorbs the light, but pigmentation defects let the red fundus light pass through.
Sclerotic Scatter
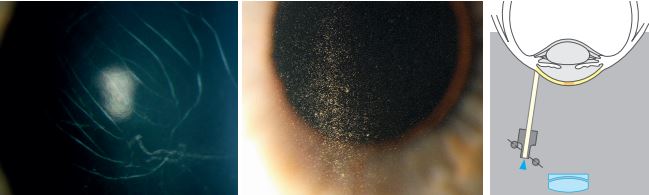
The wide decentred slit beam is projected onto the limbus. The light striking the limbus is internally reflected through the corneal tissue like a fibre optic. Corneal changes or abnormalities can be visualized by reflecting the scattered light. This is done on a magnification of about X6 or x10.
Oscillating Illumination of Koeppe
This one of the Slit Lamp illumination techniques that doctors hardly pay attention to. With this technique, you give the slit lamp an oscillatory movement, making it easy to detect filaments or minute objects in the aqueous that might easily escape detection.
References
- Kaur K, Gurnani B. Slit-Lamp Biomicroscope. [Updated 2023 Jun 11]. In: StatPearls [Internet]. Treasure Island (FL): StatPearls Publishing; 2023 Jan-. Available from: https://www.ncbi.nlm.nih.gov/books/NBK587440
- https://www.haag-streit.com/fileadmin/Haag-Streit_Diagnostics/slitlamps/Imaging/Brochures_Flyers/BRO_ImagingGuide-7200668-02110_web.pdf
- https://www.healthpartners.com/institute/wp-content/uploads/2018/05/3-SA-45-SLE-Handouts-new.pdf